This tutorial explains how we can create simple Web Services using Visual Studio.
1. Create the Web Service
First create new project and select "New ASP.NET Web Service Application" and I'm giving the name "MyFirstWebService" to it, you can give any name to your project.

Now you can see auto generated code that you can add methods to create your web service. You can see simple method "HelloWorld" and in this sample code I have removed it.
I'm going to add simple method called "simpleMethod" which takes a string as an input and add "Hello" to beginning of that string. Now the code will appear like bellow.
using System;
using System.Collections.Generic;
using System.Linq;
using System.Web;
using System.Web.Services;

namespace MyFirstWebService
{
    /// <summary>
    /// Summary description for Service1
    /// </summary>
    [WebService(Namespace = "http://tempuri.org/")]
    [WebServiceBinding(ConformsTo = WsiProfiles.BasicProfile1_1)]
    [System.ComponentModel.ToolboxItem(false)]
    // To allow this Web Service to be called from script, using ASP.NET AJAX, uncomment the following line.
    // [System.Web.Script.Services.ScriptService]
    public class Service1 : System.Web.Services.WebService
    {
        [WebMethod]
        public string simpleMethod(String srt)
        {
            return "Hello "+srt;
        }

        [WebMethod]
        public int anotherSimpleMethod(int firstNum, int secondNum)
        {
            return firstNum + secondNum;
        }

    }
}
Then you can run your code and you can see the resulting page as bellow.

2. Create the Client Program
We have created our simple web service and we have to create small client program to use this web service. There you can open another instant of Visual Studio and create new "Console Application" project.

Then you have to add Service Reference so that you can access your web service. Here are the screen-shots.


Here you have to give the URL of the web service we created earlier. As I said before previously created web service application should be running on another instant of Visual Studio.

Note that I have set the "Web reference name" as "TestWeb".

Now you can update your client program using following code. Note the line 5 "using WebServiceTest.TestWeb;".
using System;
using System.Collections.Generic;
using System.Linq;
using System.Text;
using WebServiceTest.TestWeb;

namespace WebServiceTest
{
    class Program
    {
        static void Main(string[] args)
        {
            Service1 webservice = new Service1();
            string srt = webservice.simpleMethod("Saranga Rathnayake");
            Console.WriteLine(srt);
            Console.WriteLine(webservice .anotherSimpleMethod(4,3));
        }
    }
}
Now you can run the client program to see the result.

3. Publish Our Web Service in Internet Information Service (IIS)
Let's see how we can publish our web service in IIS. Otherwise you always need to run your web service application in separate VS instant. There first stop the web service application and go to the Solution Explore and Right Click on the project. Then select "Publish...".

Then the following window will appear and there you can directly publish to the IIS by selecting "Web Deploy" as the publishing method. But here I'm going to use the "File System as the publishing method. There you have to provide the target location. I have created new folder called "MyApp" in my D drive and selected it.

Now click "Publish" and check the "MyApp" folder. There you will be able to see Service1.asmx file, Web.config file and bin folder which contains the DLL file has been generated. Then copy this "MyApp" folder to "wwwroot" folder. You may find it in "C:\inetpub\wwwroot".
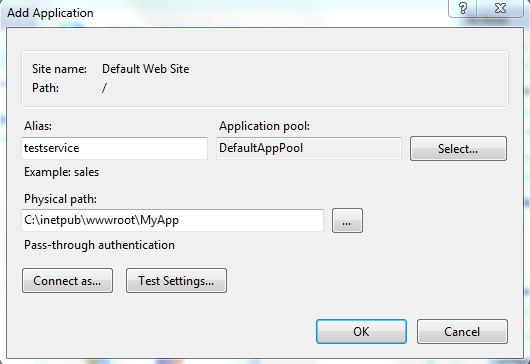
Now enable IIS in your computer and open IIS Manager. I'm going to add my service to Default Web Site. There Right Click on the "Default Web Site" and click "Add Application...".

There you will get following window. Now you can provide appropriate Alias (I have given testservice) and select the physical path of your application. There you can provide the path to the folder we copied previously as following figure and click Ok.
You have to make sure that the application pool identity has Read access to the physical path. So it is better if you copy your files to the "wwwroot" folder other than keep it in separate partition. Please check the following screen-shot
Now restart the IIS and goto http://localhost/testservice/Service1.asmx. You will be able to see the Web Service running.

Now you have published your web service in IIS and you can update the Client Program by giving the new Web Reference URL using Properties Window.
If you are interested in creating web services in java, please follow my post Create Web Service in Java Using Apache Axis2 and Eclipse


thanks a looooot easy to understand.
ReplyDeleteHi, great posting, straightforward.
ReplyDeleteDid you also post about how to publish your web service in IIS?
Thanks a lot.. easy method to create webservice..
ReplyDeletethanx dude ..its very usefull for me.
ReplyDeleteIt was really helpful. If you are new to making a web service. Snapshots make it much easier to understand.
ReplyDeletegood one
ReplyDelete@ Ashraf Hossain,
ReplyDeleteThanks for commenting...
@ Tony,
Yes, I'll post it. Thanks for commenting.
@ Guide,
Thank you very much for your comment.
@ Anonymous Cementer's,
Thank you very much...
Dear Saranga,
ReplyDeletewould you give me an example how to send xml file to web service using asp.net
and if I was not wrong if we would send the xml file we should submit username and password.
@ Baraa,
ReplyDeleteYou can create web service method that accept FileStream to get the task done. Following link will help you.
File Upload with ASP.NET
I didn't get the second part of your question, what do you really want to do ? Do you want to check the username and password using web service ?
Sorry... but resolution on the page is too small. One can't see enithing!
ReplyDeleteEven when zooming in.
@Anonymous,
ReplyDeleteWhat is your OS and browser ?
Hello Saranga,
ReplyDeleteMany thanks for this post. However, I must say that everything was going well for me until I tried to select add application to IIS. I failed to do so. I have OS XP. Could you please how to do this on this operation system please?
Behzad
Very helpful post. Thank you much!
ReplyDelete@ behzad,
ReplyDeleteFirst you have to install IIS on XP. Then you can add the application.
@ DT,
Thanks for commenting...
very good brother it is excellent
ReplyDelete@ NASIR HUSSAIN,
ReplyDeleteGlad you are enjoying my blog, Thanks for commenting.
Very Helpful example, thanks.
ReplyDeleteJust 1 thing, for some reason i had to put the c# code inside of Service1.asmx and delete Service1.asmx.cs, bc when i put it in the hosting (Godaddy) didn't work.
Any Idea Why?? The error msg is that cannot find the class, i did check everything and everything was perfect and works perfect in my pc, but in the internet didn't....
Hi, I am new to asp.net programming, i try to develop sample web service in visual studio 2010. By selecting 3.5 frame work and open web service project, but got some errors. Error info:1. he primary reference "System.Web", which is a framework assembly, could not be resolved in the currently targeted framework. ".NETFramework,Version=v3.5". To resolve this problem, either remove the reference "System.Web" or retarget your application to a framework version which contains "System.Web". 2. The referenced component 'System' could not be found. 3. The referenced component 'System.Web' could not be found. Please help me.
ReplyDeleteThanks guys, you just give me short description about Web Service. easy to try, easy to understand.. thanks
ReplyDeleteExcellent Article for the understanding of web services..
ReplyDeleteHi, I have following error while publishing my web service on IIS 7.5, i am using win 7 and VS10
ReplyDelete:This configuration section cannot be used at this path. This happens when the section is locked at a parent level. Locking is either by default (overrideModeDefault="Deny"), or set explicitly by a location tag with overrideMode="Deny" or the legacy allowOverride="false".
@ Abdul Malik,Abhijeet
ReplyDeleteThank you for your comments...
@ Sanjay,
Please follow this thread, hope it will help.
http://forums.iis.net/p/1023069/1390229.aspx
Good One ! Very easy to understand !
ReplyDeleteThanks Man ! Really simple & easy to understand !
ReplyDelete@ Bala Kiran,
ReplyDeleteYou are welcome...
@ Bala Kiran,
Thanks for commenting...
Very useful post thank you so much.
ReplyDeleteThanks man..........!
ReplyDeleteIts really useful.........!
Thanks once again...........!
Thanks man............!
ReplyDeleteIts really useful...........!
Thanks once again.........!
@ Ateş GÜRAL,
ReplyDeleteThanks for commenting.
@ Dany,
ReplyDeleteYou are welcome...
Thanks man, a very helpful and informative post.
ReplyDelete@ Don Dada,
ReplyDeleteYou are welcome.
Is it possible to create sessions for users, after they have logged in? I'm trying to produce a whole number of web services that require a user to authenticate first. I've looked online at a few tutorials, but have been finding it hard to understand many of the examples
ReplyDeleteYou seemed to forgot that there is a required addon to Visual Studio 2010 in order to create an web service project... At least with the VS 2010 Ultimate SP1 version.
ReplyDeleteCould you please mentioned what the name of the addon is?
The first screenshot with the circles that shows web service (etc) does not exist with the default VS install.
@ Shannara,
ReplyDeleteDid you try changing the .NET framework to 3.5 ?
Great stuff. I've read LOTS of tutorials - and yours is the best so far. Thank you!
ReplyDeleteReally great tutorial, really helpful. Thank you!
ReplyDeleteyou are welcome, thanks for commenting...
DeleteGr8 tutorial aiya.....
ReplyDeletethax a lot
you are welcome...
DeleteGreat post. Thanks so much :)
ReplyDeleteyou are welcome...
DeleteI'm not able to see "publishweb" windows.I'm using VS2008 with ie8.
ReplyDeleteWhat could be the problem??
nice and very easy to learn article good job my dear......................
ReplyDeleteReally nice & easy to grasp example...
ReplyDeleteThanks A Lot!!
thanks very good article.
ReplyDelete...... ajit
thnx alot for a nice blog.... could plz also tell how to upload file in dis same example so dat i ll be able to upload a file?
ReplyDeletePlz solve my query ASAP as i have to work on web service very soon....
ReplyDeleteCan U specify the time/date that u'll take to solve it..
and also plz specify ur links on the advance web service tutorial..
Thanks again...
Hi.
ReplyDeleteWhen i add a service reference -> paste the URL and hit the Go button i get the error saying page cannot be displayed..
The error at the right corner says"There was an error donwloading 'http://localhost:2817/Service1.asmx'. Unable to connect to the remote server. No connection could be made because the target machine actively refused it 127.0.0.1:2817. There was an error downloading 'http://localhost:2817/Service1.asmx/$metadat'. Unable to connect'. "
Anything i am missing in doing the steps?
Any suggestions/help will b appreciated.. Thanks in advance !!
u must run web service project in another instance of visual studio and the client project in another instance of visual studio
Deletecan someone explain after doing this, how my friend can access my IIS?
ReplyDeleteThank you, it was a great tutorial..
ReplyDeleteBut, did you know hou to make it in VS2012 ?
I didn't find the >new project >ASP.NET Web Service Application
Web Services are old now, please try to create WCF Service Application.
DeleteThanks !
Very nice and Easy to learn ..
ReplyDeleteThanks
Edwin A
You are welcome...
DeleteThere is no way to get it to work in VS2008 because you can not use the System.Linq to generate a WSDL file. VS2008 is not able to work with .NET4.0. Is there an easy way to create a webservice with basicHttpBinding in VS2008 and .NET3.5?
ReplyDeleteThanks
Nino
i dont know anything about web service but i to learn this.so, plz help me. and say what useful of web services.
ReplyDeleteHow do I publish web application to my blog? I want users to be able to click on it and it should run on their browsers
ReplyDeleteThis is a great explanation. very easy to understand, great job.
ReplyDeleteThanks a lot.
Thanx a lot good explanation
ReplyDeleteHi,
ReplyDeleteWhen you publish web service to IIS, is there any particular reasion to choose File System over Wep Deploy?
This post is really helpful for introducing web services in Visual Studio and .NET environment. Thanks a lot!!!
ReplyDeleteVery good explanation, thanks a lot.
ReplyDeleteVery good explanation, thanks a lot.
ReplyDeleteIt is really thankful to know how to work with web service. In addition this article describes how to use it in console application after publishing......
ReplyDeleteVery useful! Tnks ;)
ReplyDeleteVery Good, thank's a lot !!!
ReplyDeleteAwesome example and a straight forward article
ReplyDeleteIts confusing, why we are still need webservices, when we have REST and other Robust services ?
I am looking for the answer of above question......
Thanks,
Gaurav Arora - http://msdotnetheaven.com
Does anyone know why I get the following error with creating the application to use the webservice?
ReplyDeleteError 1 The type or namespace name 'TestWeb' does not exist in the namespace 'WebServiceTest' (are you missing an assembly reference?)
I got the same problem…. Is there any available solution???
DeleteIt might be because you named the web reference or the client app differently.
Deleteusing [clientProjectName].[webReferenceName]
I had the same problem and solved it by using the directive correctly.
Salam!
ReplyDeleteI dont Have a C:\inetpub\wwwroot folder in my C Drive, can you please guide me what to install for having this folder so then I can publish my WebService as you taught here in your example.
please check this post related to install IIS.
Deletehttp://sarangasl.blogspot.com/2010/10/install-iis-in-windows-7-or-vista.html
thanks...
Salam!
ReplyDeleteI dont Have a C:\inetpub\wwwroot folder in my C Drive, can you please guide me what to install for having this folder so then I can publish my WebService as you taught here in your example.
you have to install IIS in your pc.
DeleteFirstly, This is the most concrete post i found for creating a WS in ASP.NET, Tanx Loadz.
ReplyDeleteA lil issue , i published the Service to Local IIS , i could access it from the inetpub/wwwroot , but i get an error
Warning 1:Unable to view published application at http://MyComputer/publish.htm.
Also i cldnt open it through my Web Browser!!!Plz Help Me Out!
Are you using Visual Studio 2008 ?
Deleteplease follow the steps in following post.
http://social.msdn.microsoft.com/Forums/en-US/winformssetup/thread/4bf6d3e1-fec2-4ef4-930d-80c76249db47/
veryy helpful .....thnku.....
ReplyDeleteSAKAYA,,,,,,,,,,,
ReplyDeleteThank You sooo much....
ReplyDeleteWhen I try to add the web reference I get, "The HTML document does not contain Web service discovery information."
ReplyDeleteWhen I try to add the web reference in my windows program I get, "The HTML document does not contain Web service discovery information."
ReplyDeleteWhen I try to add the web reference I get, "The HTML document does not contain Web service discovery information."
ReplyDeleteThanks.. really helpful..
ReplyDeleteThanks... Realy helpful article..
ReplyDeleteThanks that was helpful. I was using Visual studio 2012 and .Net Framework 3.5. When I clicked on publish, I got a different window. I just had to choose a folder for publishing, that was it. Then I had to just click on next. Finally an application of type - ClickOnce Application Deployment manifest was created in the folder that I chose.
ReplyDeletegood
ReplyDeleteNice article that is easy to understand for the newbies... can you please help me in adding security to the web services using c sharp dot net visual studio 2008... Thankyou
ReplyDeleteI found this article very nice. Interesting and helpful to get the picture of webservice. Please continue with it.
ReplyDeleteI have one question. What does the WebServiceTest do in the line ;
I know the TestWeb is the name of the reference but what is WebServiceTest and why do we use it?
Is that not possible to use the using statement without WebServiceTest forexample as ?
Can some one explaine for me?
Kind Regards;
Best tutorial ever of Web Service for beginner...
ReplyDeletesuperb
ReplyDeletesuperb
ReplyDeleteso, can you tell me how can I call a web service created by VS or Java from Oracle
ReplyDeleteSo, can you please tell me how I can call a web service created by VS or Java from Oracle DB
ReplyDeleteThanx a lot.
ReplyDeleteEasy to follow!
I can't add using WebserviseTest.Test referance in my console app
ReplyDeleteI can't add the using WebServiceTest.TestWeb; referance in my console app. please help me
ReplyDeleteGood One.
ReplyDeleteThanks
Suresh T G
Good One.
ReplyDeleteThanks
how to implement language translations. They have 97 translations to get through ...please send mail to mdilip.sp@gmail.com
ReplyDeleteThanks very much for tutorial.I have a question that after publishing in IIS how can i add another method to Web service and update it in the IIS.
ReplyDeleteSo easy to understand! I successfully created my first web service app following your instruction. Thanks very very much!
ReplyDeleteGood tutorial!
ReplyDeleteGood tutorial! works against ksoap2 in java
ReplyDeletewhat does "publish your web service in IIS" mean? do we have to do it always when we are going to create a web service? does it need to sign in to Microsoft?
ReplyDeleteNow a days ecommerce business became huge growth because of online customers.People wants to buy all things through online.Accordingly more ecommerce websites are evolving everyday.
ReplyDeleteBest Ecommerce Service Provider |Web Design Company in Coimbatore