Showing posts with label Web Service. Show all posts

Tuesday, October 25, 2011

Android Web Service Access Tutorial

In this post I'm going to illustrate how we can access web service in Android using ksoap2-android project that provides a lightweight and efficient SOAP library for the Android platform.

You can download the jar file from following link;

http://ksoap2-android.googlecode.com/svn/m2-repo/com/google/code/ksoap2-android/ksoap2-android-assembly/2.5.8/ksoap2-android-assembly-2.5.8-jar-with-dependencies.jar

Here is the sample code that illustrate SOAP web service call. I have access a live web service ConvertWeight from http://www.webserviceX.NET/ which convert weight from one unit to another. I have set "envelope.dotNet = true;" in Line 53 since I'm accessing .NET web service. You can comment that line if your web service is not .NET one.

package com.sencide;
 
import org.ksoap2.SoapEnvelope;
import org.ksoap2.serialization.PropertyInfo;
import org.ksoap2.serialization.SoapObject;
import org.ksoap2.serialization.SoapPrimitive;
import org.ksoap2.serialization.SoapSerializationEnvelope;
import org.ksoap2.transport.HttpTransportSE;
 
import android.app.Activity;
import android.os.Bundle;
import android.util.Log;
import android.widget.TextView;
 
public class AndroidWebService extends Activity {
  
    private final String NAMESPACE = "http://www.webserviceX.NET/";
    private final String URL = "http://www.webservicex.net/ConvertWeight.asmx";
    private final String SOAP_ACTION = "http://www.webserviceX.NET/ConvertWeight";
    private final String METHOD_NAME = "ConvertWeight";
 
    /** Called when the activity is first created. */
    @Override
    public void onCreate(Bundle savedInstanceState) {
        super.onCreate(savedInstanceState);
        setContentView(R.layout.main);
 
        SoapObject request = new SoapObject(NAMESPACE, METHOD_NAME); 
      
        String weight = "3700";
        String fromUnit = "Grams";
        String toUnit = "Kilograms";
      
        PropertyInfo weightProp =new PropertyInfo();
        weightProp.setName("Weight");
        weightProp.setValue(weight);
        weightProp.setType(double.class);
        request.addProperty(weightProp);
         
        PropertyInfo fromProp =new PropertyInfo();
        fromProp.setName("FromUnit");
        fromProp.setValue(fromUnit);
        fromProp.setType(String.class);
        request.addProperty(fromProp);
         
        PropertyInfo toProp =new PropertyInfo();
        toProp.setName("ToUnit");
        toProp.setValue(toUnit);
        toProp.setType(String.class);
        request.addProperty(toProp);
        
        SoapSerializationEnvelope envelope = new SoapSerializationEnvelope(SoapEnvelope.VER11);
        envelope.dotNet = true;
        envelope.setOutputSoapObject(request);
        HttpTransportSE androidHttpTransport = new HttpTransportSE(URL);
 
        try {
            androidHttpTransport.call(SOAP_ACTION, envelope);
            SoapPrimitive response = (SoapPrimitive)envelope.getResponse();
            Log.i("myApp", response.toString());
    
            TextView tv = new TextView(this);
            tv.setText(weight+" "+fromUnit+" equal "+response.toString()+ " "+toUnit);
            setContentView(tv);
 
        } catch (Exception e) {
            e.printStackTrace();
        }
    }
}

You have to add INTERNET permission to AndroidManifest.xml as follows;

<?xml version="1.0" encoding="utf-8"?>
<manifest xmlns:android="http://schemas.android.com/apk/res/android"
      package="com.sencide"
      android:versionCode="1"
      android:versionName="1.0">

    <application android:icon="@drawable/icon" android:label="@string/app_name">
        <activity android:name=".AndroidWebService"
                  android:label="@string/app_name">
            <intent-filter>
                <action android:name="android.intent.action.MAIN" />
                <category android:name="android.intent.category.LAUNCHER" />
            </intent-filter>
        </activity>

    </application>
    
    <uses-permission android:name="android.permission.INTERNET"></uses-permission>
</manifest>

You can download the source code of above project (Password:sara).

I have updated my previous code in the post Android Login Screen Using HttpClient to authenticate users from web service. There I have illustrated how you can start new activity if the login is successful.

You can download the updated source code with sample .NET web service application (Password:sara).

Wednesday, September 29, 2010

Create Simple Web Service with Visual Studio

This tutorial explains how we can create simple Web Services using Visual Studio.

1. Create the Web Service

First create new project and select "New ASP.NET Web Service Application" and I'm giving the name "MyFirstWebService" to it, you can give any name to your project.

Now you can see auto generated code that you can add methods to create your web service. You can see simple method "HelloWorld" and in this sample code I have removed it.

I'm going to add simple method called "simpleMethod" which takes a string as an input and add "Hello" to beginning of that string. Now the code will appear like bellow.

using System;
using System.Collections.Generic;
using System.Linq;
using System.Web;
using System.Web.Services;

namespace MyFirstWebService
{
    /// <summary>
    /// Summary description for Service1
    /// </summary>
    [WebService(Namespace = "http://tempuri.org/")]
    [WebServiceBinding(ConformsTo = WsiProfiles.BasicProfile1_1)]
    [System.ComponentModel.ToolboxItem(false)]
    // To allow this Web Service to be called from script, using ASP.NET AJAX, uncomment the following line.
    // [System.Web.Script.Services.ScriptService]
    public class Service1 : System.Web.Services.WebService
    {
        [WebMethod]
        public string simpleMethod(String srt)
        {
            return "Hello "+srt;
        }

        [WebMethod]
        public int anotherSimpleMethod(int firstNum, int secondNum)
        {
            return firstNum + secondNum;
        }

    }
}

Then you can run your code and you can see the resulting page as bellow.

2. Create the Client Program

We have created our simple web service and we have to create small client program to use this web service. There you can open another instant of Visual Studio and create new "Console Application" project.

Then you have to add Service Reference so that you can access your web service. Here are the screen-shots.


Here you have to give the URL of the web service we created earlier. As I said before previously created web service application should be running on another instant of Visual Studio.

Note that I have set the "Web reference name" as "TestWeb".

Now you can update your client program using following code. Note the line 5 "using WebServiceTest.TestWeb;".

using System;
using System.Collections.Generic;
using System.Linq;
using System.Text;
using WebServiceTest.TestWeb;

namespace WebServiceTest
{
    class Program
    {
        static void Main(string[] args)
        {
            Service1 webservice = new Service1();
            string srt = webservice.simpleMethod("Saranga Rathnayake");
            Console.WriteLine(srt);
            Console.WriteLine(webservice .anotherSimpleMethod(4,3));
        }
    }
}

Now you can run the client program to see the result.

3. Publish Our Web Service in Internet Information Service (IIS)

Let's see how we can publish our web service in IIS. Otherwise you always need to run your web service application in separate VS instant. There first stop the web service application and go to the Solution Explore and Right Click on the project. Then select "Publish...".

Then the following window will appear and there you can directly publish to the IIS by selecting "Web Deploy" as the publishing method. But here I'm going to use the "File System as the publishing method. There you have to provide the target location. I have created new folder called "MyApp" in my D drive and selected it.

Now click "Publish" and check the "MyApp" folder. There you will be able to see Service1.asmx file, Web.config file and bin folder which contains the DLL file has been generated. Then copy this "MyApp" folder to "wwwroot" folder. You may find it in "C:\inetpub\wwwroot".

Now enable IIS in your computer and open IIS Manager. I'm going to add my service to Default Web Site. There Right Click on the "Default Web Site" and click "Add Application...".

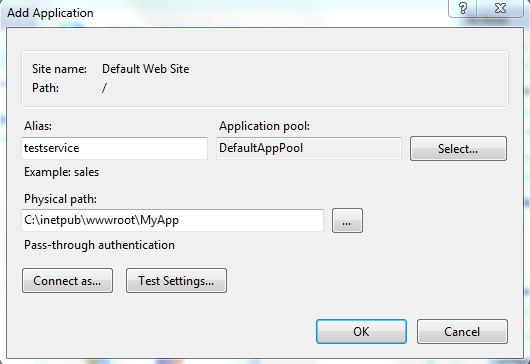
There you will get following window. Now you can provide appropriate Alias (I have given testservice) and select the physical path of your application. There you can provide the path to the folder we copied previously as following figure and click Ok.

You have to make sure that the application pool identity has Read access to the physical path. So it is better if you copy your files to the "wwwroot" folder other than keep it in separate partition. Please check the following screen-shot

Now restart the IIS and goto http://localhost/testservice/Service1.asmx. You will be able to see the Web Service running.

Now you have published your web service in IIS and you can update the Client Program by giving the new Web Reference URL using Properties Window.

If you are interested in creating web services in java, please follow my post Create Web Service in Java Using Apache Axis2 and Eclipse