Tuesday, June 21, 2011

Android Login Screen Using HttpClient

I have updated this code to use web service and open new screen if the login is successful in my post Android Web Service Access Tutorial.

In Android we can use HTTP POST request with org.apache.http.client.HttpClient to post data to a URL. This sample project illustrate how we can post data to a URL and get the response.


package com.sencide;

import java.io.BufferedReader;
import java.io.IOException;
import java.io.InputStream;
import java.io.InputStreamReader;
import java.util.ArrayList;
import java.util.List;

import org.apache.http.HttpResponse;
import org.apache.http.NameValuePair;
import org.apache.http.client.ClientProtocolException;
import org.apache.http.client.HttpClient;
import org.apache.http.client.entity.UrlEncodedFormEntity;
import org.apache.http.client.methods.HttpPost;
import org.apache.http.impl.client.DefaultHttpClient;
import org.apache.http.message.BasicNameValuePair;

import android.app.Activity;
import android.os.Bundle;
import android.util.Log;
import android.view.View;
import android.view.View.OnClickListener;
import android.widget.Button;
import android.widget.EditText;
import android.widget.TextView;

public class AndroidLogin extends Activity implements OnClickListener {
 
 Button ok,back,exit;
 TextView result;
 
    /** Called when the activity is first created. */
    @Override
    public void onCreate(Bundle savedInstanceState) {
        super.onCreate(savedInstanceState);
        setContentView(R.layout.main);
        
        // Login button clicked
        ok = (Button)findViewById(R.id.btn_login);
        ok.setOnClickListener(this);
        
        result = (TextView)findViewById(R.id.lbl_result);
        
    }
    
    public void postLoginData() {
        // Create a new HttpClient and Post Header
        HttpClient httpclient = new DefaultHttpClient();
        
        /* login.php returns true if username and password is equal to saranga */
        HttpPost httppost = new HttpPost("http://www.sencide.com/blog/login.php");

        try {
            // Add user name and password
         EditText uname = (EditText)findViewById(R.id.txt_username);
         String username = uname.getText().toString();

         EditText pword = (EditText)findViewById(R.id.txt_password);
         String password = pword.getText().toString();
         
            List<NameValuePair> nameValuePairs = new ArrayList<NameValuePair>(2);
            nameValuePairs.add(new BasicNameValuePair("username", username));
            nameValuePairs.add(new BasicNameValuePair("password", password));
            httppost.setEntity(new UrlEncodedFormEntity(nameValuePairs));

            // Execute HTTP Post Request
            Log.w("SENCIDE", "Execute HTTP Post Request");
            HttpResponse response = httpclient.execute(httppost);
            
            String str = inputStreamToString(response.getEntity().getContent()).toString();
            Log.w("SENCIDE", str);
            
            if(str.toString().equalsIgnoreCase("true"))
            {
             Log.w("SENCIDE", "TRUE");
             result.setText("Login successful");   
            }else
            {
             Log.w("SENCIDE", "FALSE");
             result.setText(str);             
            }

        } catch (ClientProtocolException e) {
         e.printStackTrace();
        } catch (IOException e) {
         e.printStackTrace();
        }
    } 
  
    private StringBuilder inputStreamToString(InputStream is) {
     String line = "";
     StringBuilder total = new StringBuilder();
     // Wrap a BufferedReader around the InputStream
     BufferedReader rd = new BufferedReader(new InputStreamReader(is));
     // Read response until the end
     try {
      while ((line = rd.readLine()) != null) { 
        total.append(line); 
      }
     } catch (IOException e) {
      e.printStackTrace();
     }
     // Return full string
     return total;
    }

    @Override
    public void onClick(View view) {
      if(view == ok){
        postLoginData();
      }
    }

}

Following code is the content of mail.xml file that is used in the above code.

<?xml version="1.0" encoding="utf-8"?>
<AbsoluteLayout
android:layout_width="fill_parent"
android:layout_height="fill_parent"
xmlns:android="http://schemas.android.com/apk/res/android"
>
<EditText android:layout_width="150px" android:layout_height="wrap_content" android:textSize="18sp" android:id="@+id/txt_username" android:layout_y="132dip" android:layout_x="128dip"></EditText>
<EditText android:layout_width="150px" android:layout_height="wrap_content" android:textSize="18sp" android:password="true" android:id="@+id/txt_password" android:layout_x="128dip" android:layout_y="192dip"></EditText>
<Button android:layout_width="100px" android:layout_height="wrap_content" android:id="@+id/btn_login" android:layout_x="178dip" android:layout_y="252dip" android:text="Login"></Button>
<TextView android:layout_width="wrap_content" android:layout_height="wrap_content" android:id="@+id/lbl_username" android:text="User Name" android:layout_x="37dip" android:layout_y="150dip"></TextView>
<TextView android:layout_width="wrap_content" android:layout_height="wrap_content" android:id="@+id/lbl_password" android:text="Password" android:layout_y="207dip" android:layout_x="50dip"></TextView>
<TextView android:layout_width="wrap_content" android:layout_height="wrap_content" android:id="@+id/lbl_top" android:textSize="16sp" android:typeface="sans" android:text="Please Loggin First" android:layout_x="29dip" android:layout_y="94dip"></TextView>
<TextView android:layout_width="wrap_content" android:layout_height="wrap_content" android:layout_y="312dip" android:layout_x="50dip" android:id="@+id/lbl_result"></TextView>
</AbsoluteLayout>
Following code is the content of AndroidManifest.xml file that is used in this project. There note that I have add the line <uses-permission android:name= "android.permission.INTERNET".
<?xml version="1.0" encoding="utf-8"?>
<manifest xmlns:android="http://schemas.android.com/apk/res/android"
      package="com.sencide"
      android:versionCode="1"
      android:versionName="1.0">

 <uses-permission android:name="android.permission.INTERNET" />
    <application android:icon="@drawable/icon" android:label="@string/app_name">
        <activity android:name=".AndroidLogin"
                  android:label="@string/app_name">
            <intent-filter>
                <action android:name="android.intent.action.MAIN" />
                <category android:name="android.intent.category.LAUNCHER" />
            </intent-filter>
        </activity>

    </application>
</manifest>

You can download the source code of above project (Password:sara).

Wednesday, June 8, 2011

SQL Server Authentication enabling using Microsoft SQL Server Management Studio

If you install the Microsoft SQL Server using Windows Authentication mode, the "sa" account is disabled by default. So if you plan to use SQL Server Authentication, you have to enable the "sa" account. This tutorial tells you how to enable the "sa" account.

1. First, Login to the SQL Server Management Studio using Windows Authentication. Right-click on the database instance, and go to Properties.

2. Then on Properties page, click on Security and select SQL Server and Windows Authentication mode, and click on OK to close the Server Properties page.

3. Now you will get dialog box saying that you should restart your SQL Server to take the changes take effect. Is is not done yet, you have to done one more thing to enable the "sa" login.

4. Now expand Security folder and go to Logins. You can see the "sa" account is disabled when you install SQL Server using Windows Authentication mode.

5. Then right-click on the "sa" account and go to Login Properties. There you can set a password for the "sa" account.


6. Click on the Status page. There you can see the "sa" account is disabled by default. Click on the Enabled button to enable it. Then click on Ok to close the "sa" Login Properties.

Now "sa" account is enabled and you can login to the SQL instance using the "sa" account after restarting the SQL Server.

Note: SQL Server service needs to be restarted to make this change effective.

Tuesday, October 5, 2010

Install IIS in Windows 7 or Vista

This tutorial discuss how you can enable (Internet Information Service) IIS in Windows 7 or Windows Vista. I have provided screen-shots so that you can easily understand.

First go to control panel and select Programs.


Then select Internet Information Services. (If you plan to run web services you have to select ASP.NET under Application Development Features as following figure)

Now you have enabled IIS and try "http://localhost" in your browser and you will get following page.

Wednesday, September 29, 2010

Create Simple Web Service with Visual Studio

This tutorial explains how we can create simple Web Services using Visual Studio.

1. Create the Web Service

First create new project and select "New ASP.NET Web Service Application" and I'm giving the name "MyFirstWebService" to it, you can give any name to your project.

Now you can see auto generated code that you can add methods to create your web service. You can see simple method "HelloWorld" and in this sample code I have removed it.

I'm going to add simple method called "simpleMethod" which takes a string as an input and add "Hello" to beginning of that string. Now the code will appear like bellow.

using System;
using System.Collections.Generic;
using System.Linq;
using System.Web;
using System.Web.Services;

namespace MyFirstWebService
{
    /// <summary>
    /// Summary description for Service1
    /// </summary>
    [WebService(Namespace = "http://tempuri.org/")]
    [WebServiceBinding(ConformsTo = WsiProfiles.BasicProfile1_1)]
    [System.ComponentModel.ToolboxItem(false)]
    // To allow this Web Service to be called from script, using ASP.NET AJAX, uncomment the following line.
    // [System.Web.Script.Services.ScriptService]
    public class Service1 : System.Web.Services.WebService
    {
        [WebMethod]
        public string simpleMethod(String srt)
        {
            return "Hello "+srt;
        }

        [WebMethod]
        public int anotherSimpleMethod(int firstNum, int secondNum)
        {
            return firstNum + secondNum;
        }

    }
}

Then you can run your code and you can see the resulting page as bellow.

2. Create the Client Program

We have created our simple web service and we have to create small client program to use this web service. There you can open another instant of Visual Studio and create new "Console Application" project.

Then you have to add Service Reference so that you can access your web service. Here are the screen-shots.


Here you have to give the URL of the web service we created earlier. As I said before previously created web service application should be running on another instant of Visual Studio.

Note that I have set the "Web reference name" as "TestWeb".

Now you can update your client program using following code. Note the line 5 "using WebServiceTest.TestWeb;".

using System;
using System.Collections.Generic;
using System.Linq;
using System.Text;
using WebServiceTest.TestWeb;

namespace WebServiceTest
{
    class Program
    {
        static void Main(string[] args)
        {
            Service1 webservice = new Service1();
            string srt = webservice.simpleMethod("Saranga Rathnayake");
            Console.WriteLine(srt);
            Console.WriteLine(webservice .anotherSimpleMethod(4,3));
        }
    }
}

Now you can run the client program to see the result.

3. Publish Our Web Service in Internet Information Service (IIS)

Let's see how we can publish our web service in IIS. Otherwise you always need to run your web service application in separate VS instant. There first stop the web service application and go to the Solution Explore and Right Click on the project. Then select "Publish...".

Then the following window will appear and there you can directly publish to the IIS by selecting "Web Deploy" as the publishing method. But here I'm going to use the "File System as the publishing method. There you have to provide the target location. I have created new folder called "MyApp" in my D drive and selected it.

Now click "Publish" and check the "MyApp" folder. There you will be able to see Service1.asmx file, Web.config file and bin folder which contains the DLL file has been generated. Then copy this "MyApp" folder to "wwwroot" folder. You may find it in "C:\inetpub\wwwroot".

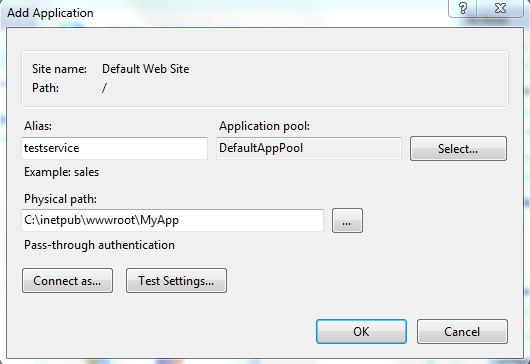
Now enable IIS in your computer and open IIS Manager. I'm going to add my service to Default Web Site. There Right Click on the "Default Web Site" and click "Add Application...".

There you will get following window. Now you can provide appropriate Alias (I have given testservice) and select the physical path of your application. There you can provide the path to the folder we copied previously as following figure and click Ok.

You have to make sure that the application pool identity has Read access to the physical path. So it is better if you copy your files to the "wwwroot" folder other than keep it in separate partition. Please check the following screen-shot

Now restart the IIS and goto http://localhost/testservice/Service1.asmx. You will be able to see the Web Service running.

Now you have published your web service in IIS and you can update the Client Program by giving the new Web Reference URL using Properties Window.

If you are interested in creating web services in java, please follow my post Create Web Service in Java Using Apache Axis2 and Eclipse

Saturday, February 20, 2010

Form Validation and Suggestions using JQuery & PHP

In this post I’m going to describe about a practical use of my previous article JQuery AJAX. Here I’m going to discuss how to validate a form and how to add auto suggests to a form using JQuery and PHP.

Download Source (Password : sara)

In the above I have given you the source code of the whole project which saves the collected data to a MySQL database. It is good if you have a basic knowledge about JavaScript and PHP to understand the codes. You can learn them very easily by referring w3schools.

Since this I’m using PHP and MySQL in the above project, you have to run the code in a server like XAMP or WAMP. In this example I’m going to illustrate with WAMP. If you have the downloaded source code, you can see a folder called "jquery_form" and within that you can find folders css,js,scripts and images. Also you can see a file called index.php.

First thing you have to do is copy the "jquery_form" folder to your WAMP server’s "www" folder. Then open the "dbc.php" file inside the "scripts" folder and change its attributes. If you already haven’t a database called "userdata" and you haven’t given a password for root account, you don’t need to make any changes.

<?php
$host = "localhost";
$dbname = "userdata";
$username = "root";
$password = "";
?>

Now do the following things when the WAMP server started. I’ll also mention the result of the given action here.

1. First run the "sql.php" file located in the "scripts" folder. The only thing you need to do is give the address to the file in the address bar. E.g. http://localhost/jquery_form/scripts/sql.php. This should be done when the first time you run the project.

I wrote this file to create a MySQL database with one table and needed fields to store the collected data. If you didn’t make changes to "dbc.php" file, there will be a databased called "userdata" and table called "details_user".

2. Then run the "index.php" file and fill the form correctly and submit. You will see your data in the database. If you try to give the same login name again, you will see the suggestions related to the name and birthday.

Let’s see the codes and check how we can add validation and suggestions. Here the JavaScript which do the above task is "validation.js" which is located in "js" folder. I’ll put the real line numbers in following piece of codes as they appear in actual file.

<title>JQuery Ajax Form | Saranga Rathnayake</title>

<!-- CSS -->
<link rel="stylesheet" href="css/styles.css" type="text/css"/>
<link type="text/css" href="css/jquery-ui-1.7.2.custom.css" rel="stylesheet" /> 

<!-- JavaScript -->
<script type="text/javascript" src="js/jquery-1.3.2.min.js"></script>
<script type="text/javascript" src="js/jquery-ui-1.7.2.custom.min.js"></script>
<script src="js/validation.js" type="text/javascript"></script>
<script type="text/javascript">
 $(function(){
  $('#datepicker').datepicker({
   dateFormat:'dd/mm/yy',
   changeMonth: true,
   changeYear: true,
   yearRange: '-90:+0',
   maxDate: '+0'
  });
 });
</script>
</head>
<div id="container">
<form id="logform" name="logform" class="logform" method="post" action="" >
<?php if(

Above lines are from the "index.php" file, there I have linked necessary CSS and JavaScipt files. You can see a JavaScipt code which use to DatePicker.

//On blur
 name.blur(validateNameAndSuggest);
 iname.blur(validateIName);
 address.blur(validateAddress);  
 email2.blur(validateEmail);
 nic.blur(validateNIC);
 phno.blur(validatePhNo);
 email.blur(validateLoginEmailAndSuggest); 
 imgveri.blur(validateImg); 
 
 // on changed
 bday.change(validateDOB);
 
 //On key press
 //name.keyup(validateName);
 //iname.keyup(validateIName); 
In the above lines I have called the validation functions in "blur" and "keyup" events. I have commented the "keyup" events, if you want them you can uncomment. Then I’ll show you how the validation works.
function validateNIC(){
  var a = $("#nic").val();
  var filter = /^[0-9]{9}[v|V]$/;
  if(filter.test(a)){
   nic.removeClass("error");
   nicInfo.text("");
   nicInfo.removeClass("error");
   return true;
  }
  //if it's NOT valid
  else{
   nic.addClass("error");
   nicInfo.text("Type a valid NIC please, format: xxxxxxxxxV");
   nicInfo.addClass("error");
   return false;
  }
 } 

In the above code I have use Regular Expressions to make the validation more easier. If the Regular Expression dose not match with the input, then I have changed the CSS Class of the text box which change its color. And also I have added some information about the error. Then let’s see how suggestions work.

function suggestLogginName(){
  
  var name = $("#fname").val();
  var bday = $("#datepicker").val();
  
  if(validateName() && validateDOB()){
   $.post("scripts/isValiedName.php",  { loginName:name, birthday:bday,suggestion:"OK" },
     function(data){
     emailInfo.html(data);
   }); 
  }

 } 

The above function calls if the entered login name exist in the database. It will post the Full Name and Birthday to "isValiedName.php" file and that PHP file will return suggested names.

Tuesday, January 26, 2010

AJAX Using JQuery Tutorial

You may know that, JQuery is a JavaScript library that we can do smart things using small pease of code. This free and open source JavaScript Library has become the most famous JavaScript Library today because of its Lightweight, Cross-browser and CSS3 Compliant.

Using JQuery we can do thing like Document Navigating, DOM Element Selecting, Creating Animations, Event Handling and Ajax Development very easily. You can learn more about JQuery from JQuery web site.

What this post about ?

This is about a thing that we mostly want when we design web sites. I'm going to discuss how we can get that work done better and smarter using JQuery AJAX. Look at the following picture which describes the whole task, we are going to do.

Just imaging that the above picture is the structure of our web site, when we click on the links at "C", we want to load different contents to the main div in "B". If we use different web pages for all those links and load them when user clicks on a link, we are loading the content on "A" and "C" unnecessarily. That is why we should use AJAX to load the content.

First, download the following example code that I'm going to describe.

Download Source Code(Password : sara)

Open the "index.html" file in your browser and check the result by clicking links "Home", "About" and "Contact Us" on "C". Ignore the problem with last link, I'll explane that later. Now open the "index.html" using a text editor. Then you will see a code like following in the <head> </head> section.

<script src="jquery-1.3.1.min.js" type="text/javascript" ></script>

That is how you can link the JQuey to your web site, it's the same way you link a JavaScript file. Then check the following peace of code.

$(document).ready(function() { 

    //$("#main").load("home.html");
 
    $("#link1").click(function(){
        $("#main").load("home.html");
    });
 
    $("#link2").click(function(){
        $.ajax({
            url: "about.html",
            cache: true,
            beforeSend: function(){
                $("#main").slideUp("fast");
            },
            success: function(html){
                $("#main").slideDown("slow");
                $("#main").html(html);
            }
        });
    });
 
    $("#link3").click(function(){
        $.post("boo.php",  { link_id:"link3" },
        function(data){
            $("#main").html(data);
        }); 
    }); 
 
});

In JQuery we are writing events inside $(document).ready function. In the above code I have given different IDs to links and call functions when they are clicked. There I have used three different ways to get the above task done.

First look at the 5th line, there I have load the "home.html" file inside the main div when click the "Home" link (id is "link1"). That is the easiest way to do a AJAX request. Then check the 9th line. There I have load the "about.html" file inside the main div when click the "About" link (id is "link2"). This method can be used to decorate our request using effects. As above code you can use beforeSend and success functions to get that work done.

If I uncomment the 3rd line, "home.html" page will load to main div in the page load. Finally check the 23rd line, this is different than above mentioned methods. Here I have get the data in a PHP file. I have call the "boo.php" file using POST method and display the result inside main div when "Contact Us" (id is "link3") clicked. Now I think you may noticed that AJAX is simple if you use JQuery.

Tuesday, January 5, 2010

Embed a Picture to Body of Gmail Message

In this post I’m going to show you how to embed a picture to body of the message in Gmail without attaching. To get this work done you have to enable Image Inserting in Google Labs. Let’s see how we can enable this.

First log in to your account and go to Settings as following picture;

Then go to Labs section and there you can find Inserting Images. Enable the feature and save the settings. See the following screen shots to more clarifications.

If you have new interface you can directly go to Lab as follows.


Now you can see new icon in tool bar, using that we can embed images to body of the message as following picture.


This is a simple thing that most people dose not aware.

Monday, December 28, 2009

ADD|Update|Delete Item SharePoint Web Services


In one of my previous article I discussed how we can retrieve data in a SharePoint List Using its Web Services. In this post I’m going to discuss how we can update a SharePoint list using Web Services. Please refer my previous article on "SharePoint List Web Service GetListItems" to learn how to add Web References to your project. Then you can use the following sample codes to Update SharePoint lists.

Updating Existing Items

In the following code I have update the "Tasks" list, there I have update the title of two items which has the ID 7 and 10.
    public void updateListItemsWS()
    {
        WS_Lists.Lists myservice = new WS_Lists.Lists();
        myservice.Credentials = System.Net.CredentialCache.DefaultCredentials;
        myservice.Url = "http://mermoss:5050/testsara/_vti_bin/Lists.asmx";
        try
        {
            System.Xml.XmlDocument xmlDoc = new System.Xml.XmlDocument();
            System.Xml.XmlElement elBatch = xmlDoc.CreateElement("Batch");

            elBatch.SetAttribute("OnError", "Continue");
            elBatch.SetAttribute("ListVersion", "1");

            string strBatch = "<Method ID='1' Cmd='Update'>" +
                  "<Field Name='ID'>7</Field>" +
                  "<Field Name='Title'>Sara1</Field></Method>" +
                  "<Method ID='2' Cmd='Update'><Field Name='ID' >10</Field>" +
                  "<Field Name='Title'>Sara2</Field></Method>";

            elBatch.InnerXml = strBatch;
            myservice.UpdateListItems("Tasks", elBatch);

        }
        catch (Exception ex)
        {
            Response.Write(ex.Message);
        }
    }
Delete Items

To delete item, use following phrase in the above code, this will delete the item which has ID of 10.

string strBatch = "<Method ID='1' Cmd='Delete'>" +
"<Field Name='ID'>10</Field></Method>";

Add New Item

To add item, use following phrase in the above code,

string strBatch = "<Method ID='1' Cmd='New'>" +
"<Field Name='ID'>New</Field>"+
"<Field Name='Title'>TestTitle1</Field>"+
"</Method>";

Thursday, December 17, 2009

SharePoint List Web Service GetListItems


In this post, I’ going to discuss how we can retrieve data from a SharePoint List using its Web Services. First to know about SharePoint Web Services please refer this. We can user List Web Service which provides methods for working with SharePoint Lists, Content Types, List Items, and Files to read a List. Here we are going to use GetListItems method.

To use the above method we should know the GUIDs of the target list and view. Please follow my article on SharePoint List GUIDs to see how we can get them.

This is how you can Add Web Reference; I’ll get created Web Site Project in Visual studio to illustrate. Actually it is simple, first click on Add Web Reference and give the URL to the Web Service.


This is a sample code to read SharePoint list,
    public void getListData()
    {
        WS_Lists.Lists myservice = new WS_Lists.Lists();
        myservice.Credentials = System.Net.CredentialCache.DefaultCredentials;
        myservice.Url = "http://merdev-moss:5050/testsara/_vti_bin/Lists.asmx";
        try
        {
            /* Assign values to pass the GetListItems method*/
            string listName = "{5C65CB1A-2E1B-488A-AC07-B115CD0FC647}";
            string viewName = "{75E689B4-5773-43CB-8324-58E42E1EB885}";
            string rowLimit = "100";

            // Instantiate an XmlDocument object
            System.Xml.XmlDocument xmlDoc = new System.Xml.XmlDocument();
            System.Xml.XmlElement query = xmlDoc.CreateElement("Query");
            System.Xml.XmlElement viewFields = xmlDoc.CreateElement("ViewFields");
            System.Xml.XmlElement queryOptions = xmlDoc.CreateElement("QueryOptions");

            /*Use CAML query*/
            query.InnerXml = "<Where><Gt><FieldRef Name=\"ID\" />" +
            "<Value Type=\"Counter\">0</Value></Gt></Where>";
            viewFields.InnerXml = "<FieldRef Name=\"Title\" />";
            queryOptions.InnerXml = "";

            System.Xml.XmlNode nodes = myservice.GetListItems(listName, viewName, query, viewFields, rowLimit, null, null);

            foreach (System.Xml.XmlNode node in nodes)
            {
                if (node.Name == "rs:data")
                {
                    for (int i = 0; i < node.ChildNodes.Count; i++)
                    {
                        if (node.ChildNodes[i].Name == "z:row")
                        {
                            Response.Write(node.ChildNodes[i].Attributes["ows_Title"].Value + "</br>");
                        }
                    }
                }
            }
        }
        catch (Exception ex)
        {
            Response.Write(ex.Message);
        }
    }
In the above code I have use CAML queries to get the result. It will return all the result because I’m searching for Items which has ID greater than 0. It is always true. If you want to know how to write CAML quires easily please refer my article on CAML & SPQuery in SharePoint.

Wednesday, December 16, 2009

SharePoint List GUIDs, How to Find?


In this post I’m going to discuss about an easiest way to find GUID of a SharePoint list and a View. If you are using the MOSS 2007 there is straight forward way to get the List GUID, these are the steps.

1. Access the list via your browser.

2. Go to Settings --> List Settings and right-click on the "Information management policy settings" links and choose Copy Shortcut.

3. Paste the URL and you can see the GUID surrounded with "{" and "}".

If you are using WSS 3.0 follow these steps, you can use this method to find the View GUID in MOSS 2007

1. Access the list via your browser and select the View you want to find the GUID.

2. Select "Modify this View" and copy the URL.

3 You will get a URL like this,

http://mysite:5050/testsara/_layouts/ViewEdit.aspx?List=%7B5C65CB1A%2D2E1B%2D488A%2DAC07%2DB115CD0FC647%7D&View=%7B75E689B4%2D5773%2D43CB%2D8324%2D58E42E1EB885%7D&Source=http%253A%252F%252Fmysite%253A5050%252Ftestsara%252FLists%252FTasks%252FAllItems%252Easpx

There you can find,

List=%7B5C65CB1A%2D2E1B%2D488A%2DAC07%2DB115CD0FC647%7D
View=%7B75E689B4%2D5773%2D43CB%2D8324%2D58E42E1EB885%7D

Replace "%7B" with "{"
Replace all "%2D" with "-"
Replace "%7D" with "}"

You are now left with the GUIDs, in the above example;

List ID is {5C65CB1A-2E1B-488A-AC07-B115CD0FC647}
View ID is {75E689B4-5773-43CB-8324-58E42E1EB885}

You can use SharePoint Tips Utility Pack if you need to get the GUID of List columns. There in menu bar, select "List Management --> Change Field Settings" and load your site.